Description
SCG-W2000 is a device that uses chemiluminescence technology for imaging. It is equipped with ahigh-sensitivity cooled camera with a resolution of 20 million pixels. It enables fast, accurate, and high-throughput detection and imaging of samples without the need for additional light sources. It finds extensive applications in the fields of life sciences, pharmaceuticals, environmental protection, and more.
Product Parameters
| Cat.No. | SCG-W2000 |
| Dimensions | 345mm x 310mm x 757mm |
| Camera | Deep-cooled high-sensitivity camera, integrated with an efficient cooling module and anti-fogging structure, ensures that the sensor surface does not fog at low temperatures. This unique technology greatly reduces image noise and ensures the acquisition of high-quality images. The temperature of the camera sensor can be controlled through software to maximize the photoelectric conversion quantum efficiency with minimal video or image noise. It supports software-triggered operation mode, allowing for single or multiple image capture with a single trigger. It also supports long exposure mode, with a maximum duration of up to 1 hour. |
| Resolution | 5440 x 3648, 20 million pixels |
| Pixel Size | 2.4μm x 2.4μm |
| Imaging Area | 230mm x 154mm |
| Cooling Temperature | Relative ambient temperature:-40°C |
| Light Source | 2 sets of LED white light sources,distributed on the left and right sides of the dark box |
| Industrial Computer | 10.4-inch, 1024 x 768, with Windows operating system |
| External Interfaces | 2 x USB 3.0 ports |
| Power | 100W |
| Net | 25Kg |
Notes:1.Do not touch or scratch the internal lenses of the dark box with hands or sharp objects.
2.After placing the experimental samples, make sure to close the cover of the instrument to prevent external light from affecting the experimental results.
3.During imaging experiments, avoid shaking the experimental table or the instrument to maintain image quality.
4.Pay attention to electrical safety. Do not pull or move the power cord during the experiment.
5.After completing the experiment, clean the samples and any residual materials inside the dark box thoroughly.
Functional Description
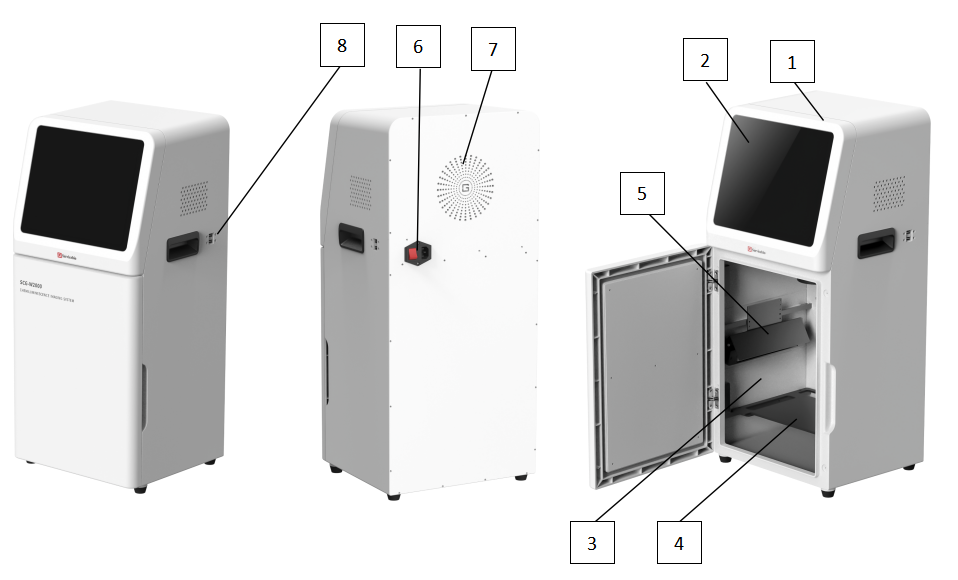
1.Internal camera lens assembly, which is the core component of the imaging system.
2.10.4-inch industrial computer with user software operating interface.
3.High-quality light-shielded imaging dark box.
4.Sample tray, removable, used for placing samples to be photographed.
5.LED white light source for illumination.
6.Power socket and switch.
7.Cooling device.
8.External USB 3.0 interface.
Operating Procedures
1. Plug in the power cord and turn on the power switch at the back of the instrument. The industrial computer will start up.
2.Open the instrument door, take out the sample tray, place the prepared text sample on the tray, and then place the tray flat in the groove inside the instrument dark box. Close the instrument door.
3.Click on the software icon on the desktop to load the software. After the software starts up normally, it will jump to the main page. The upper left part will display the company logo, the lower left part is the status bar, which can display the current camera and control board connection status, and also has detection for the insertion of removable disks. The right part is the four kinds of experiment menu options. Users can choose the corresponding experiment according to their needs. The lower right part has an icon for opening images and closing the program.

4.If the software starts abnormally and the camera or control board is not connected, the system text will turn red. The menu bar on the right side cannot be double-clicked to enter the preview page. At this time, check whether the camera and PCB board drivers are properly installed.

5.When the user selects the “Chemiluminescence” experiment and clicks on it, they will enter the preview page. On the preview page, the user needs to input the location where the experimental results will be stored. The file name is optional and can facilitate file searching for the user. The user can choose the current experiment mode as either manual exposure or automatic exposure. For manual exposure, the user needs to input the exposure time to perform the exposure. For automatic exposure, the algorithm will calculate the optimal exposure time. The exposure time refers to the exposure time for capturing the white light image. The user can also enable the preview function. Clicking on “Take a photo” will enter the photographing page, and clicking on “back”to back to the main interface.

6.Photo Capture Completed Page

Bright Field

Dark Field

Composite image
1.Invert color:This function processes the image by inverting the colors. Black becomes white, white becomes black.
2.Crop:Clicking on “Crop” will generate a region on the image that can be adjusted in size. After selecting the appropriate size, click “Crop” again to crop out the desired area.
3.Flip Vertically: This function flips the image vertically.
4.Flip Horizontally: This function flips the image horizontally.
5.Restore: This function restores the image to its original state.
6.Import: Select a file saved by the program to import it for further operations.
7.Save As:The bright field image,dark field image,and composite image will be saved.
On the results page, the image undergoes processing, and when the user clicks “Back”, the system prompts whether to save the image.

Export Page:

1.Select Path: Choose the automatically saved image files by the system, and display the contents of the files in a list format.
2.Open Directory: Open the selected directory.
3.Export: Select the content to export and the desired format to export the image.
4.Open: Choose the corresponding file from the list to open and navigate to the results page. On the results page, you can perform operations on the image, and you can also double-click the file to open it.
5.Delete: Select the image file to be deleted, and it will be deleted.
6.Back: Click “Back” to return to the preview page.